Tutorial: Hello GridWorld!
Tutorials (v1) > Hello GridWorld! > Part 1
You are viewing the tutorial for BURLAP 1; if you'd like the BURLAP 2 tutorial, go here.
Introduction
In this tutorial we will walk you through downloading BURLAP and making sure you can run it. We will walk through the instructions to both download the JAR from the precompiled source as well as how to get the source code and compile it yourself. If you only want to do it one way, feel free to only look at that section. Either way, it should be very straightforward! After the code has been downloaded, we'll show you a simple way to make sure it's working and then show you how to easily create code that links to it. For more instructions on how write meaningful code with BURLAP and what it does, you should see the other tutorials.
We will make use of the command line to test things out and compile everything. On the Mac and Linux you can just use the terminal. If you are windows, you can use either the command prompt something like Cygwin.
Acquiring BURLAP
There are two ways to acquire BURLAP. You can either download the pre-compiled JAR file (either with or without dependencies included) or compile it from the source code. In general, the source code will have the latest version and the pre-compiled JAR may be a bit older, but should be stable.
Downloading the Pre-compiled JAR
For the prec-compiled jar, you can either get one with the dependencies include in the jar, or without them included. You can get either from these locations:
- the pre-compiled jar with dependencies included;
- the pre-compiled jar without dependencies.
Use the jar without the dependencies if you are having library conflicts and need to manage them yourself. If you use the jar without dependencies, we will walk through how to include them manually in the below dependencies section.
After downloading the BURLAP jar file, you can either install it into a system level path that java will always search or your can place it in a local directory. In this tutorial we will just use it locally and point java to it.
Create a directory in which you will run your tests. In this tutorial, we will name it "testcode," but you can name it anything you want. Within that directory, create a new subdirectory called "lib" and place the burlap.jar file that you downloaded inside it. The directory structure should look like the following:
testcode
	lib
		burlap.jar
Or "burlap_no_dep.jar" instead of "burlap.jar" if you downloaded the version without dependencies.
Compiling From the source
The easiest way to get the source is with git. If you do not have git installed, install it now. You can download git from here. To compile the code, you will also need ant installed, which you can get from here if you do not already have it.
Create a directory where you will place the git distribution. You might have a git directory in your home directory already created for this, which you can use. From the command line, change directories there now. Now enter the following command:git clone https://github.com/jmacglashan/burlap.gitYou should have found that this created the directory named "burlap". Change into that directory now and you should find the following files and subdirectories:
lib
src
LICENSE
README.md
build.xml
Now type
ant dist
And you should find new subdirectories appear; in particular, the "dist" directory which will contain the BURLAP JAR file. If there were compilation errors (warnings should not be a concern) it's possible that you will need to re-download the dependencies. For convenience, BURLAP's git repository includes the dependencies that it needs, but it's possible you may have to install them yourself (see the Dependencies section and place all the JARs on which BURLAP depends in the lib directory and try ant again.)
With the burlap.jar file created we'll now try working with it. You can either install it into a system level path that java will always search or your can place it in a local directory. In this tutorial we will just use it locally and point java to it.
Create a directory in which you will run your tests. In this tutorial, we will name it "testcode," but you can name it anything you want. Within that directory, create a new subdirectory called "lib" and place the burlap.jar file that you downloaded inside it. The directory structure should look like the following:
testcode
	lib
		burlap.jar
Dependencies
Most of BURLAP can be run without any of its dependencies, but some of the algorithms and advanced tools will require other libraries to be present. For example, the RLGlue dependency allows BURLAP to communicate with other RL software.
If you are using the pre-compiled BURLAP jar that has dependencies included, you can skip this step.
If you are using a compiled version of BURLAP or the jar without dependences and you want to use all of BURLAP's features you should get the relevant JAR files and put them in the lib directory of the "testcode" directory that we created. If you compiled BURLAP from source, you can just copy the files in the BURLAP source lib directory into our testcode lib directory. Otherwise, you can download the dependencies (and their dependencies) from the below locations
- RLGlue Java Codec - You will need this if you plan on interfacing BURLAP with RLGLue.
- Apache Math Commons - For performance plotting tools.
- JFree Chart - For Performance Plotting tools.
- Snake YAML - For reading and writing states into the YAML format.
- Jackson - For reading and writing states into the JSON format.
- JOptimizer - For Max Margin Apprenticeship Learning
- SCPSolver - For Minmax, Coco-Q, and Correlated-Q algorithms. (Our choice of underlying LP solver that it uses is lpsolve.)
After putting all the relevant dependencies in the lib folder, your directory structure should look something like the following.
testcode
	lib
		burlap.jar
		JavaRLGlueCodec.jar
		LPSOLVESolverPack.jar
		SCPSolver.jar
		colt-1.2.0.jar
		commons-beanutils-1.6.jar
		commons-collections-2.1.jar
		commons-lang3-3.1.jar
		commons-logging-1.1.1.jar
		commons-math3-3.2.jar
		csparsej-1.1.1.jar
		ejml-0.25.jar
		hamcrest-core-1.3.jar
		jackson-annotations-2.2.3.jar
		jackson-core-2.2.3.jar
		jackson-databind-2.2.3.jar
		jcommon-1.0.21.jar
		jfreechart-1.0.17.jar
		joptimizer-3.2.0.jar
		joptimizer-3.3.0.jar
		junit-4.11.jar
		log4j-1.2.14.jar
		servlet.jar
		snakeyaml-1.13.jar
		xml-apis-1.0.b2.jar
Running the JAR
The simplest way to test BURLAP is to run the default main method in the GridWorld domain generator, which will launch a simple interactive visualization of the GridWorld. From the command line, change directory into your "testcode" directory if you're not already there. Then enter:
java -cp lib/*:. burlap.domain.singleagent.gridworld.GridWorldDomain
Note the the ":." after "lib/*" which adds the current directory the class path. Some users have reported errors unless that is included, even though we haven't actually written any of our own code yet! If you're in the Windows command prompt (and not cygwin), you may need to change the colon character to a semicolon.
If a GUI of a simple GridWorld appears, as shown below, then everything is working!
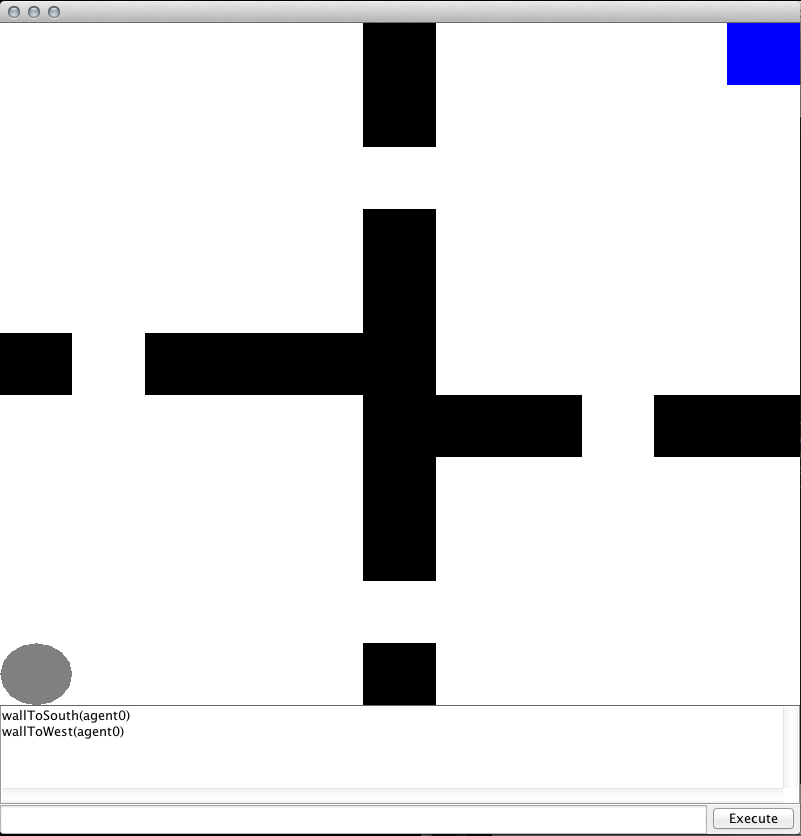
There are two ways to control the agent in the GUI. One way is to use keystrokes, which you can perform by clicking on the visualization and then pressing either the w, a, s, or d keys (you only need to click on the visualization once to get it to start accepting key strokes). Alternatively, you can use the "execute" text field and button. In the execute text field you can enter the name of the action you want the agent to perform and then press the "execute" button to have it performed. In GridWorld, the actions you can have the agent perform are named "north," "south," "east," and "west."
Hello GridWorld Code
We're now going to write a simple BURLAP hello world program for you to test. We're not going to spend any time really explaining what the code does, it's just a way to make sure that you can link to BURLAP with your own code. For a much more thorough explanation of the code, see the BURLAP java doc and other tutorials available.
In your testcode directory, create a new file named "HelloGridWorld.java". Inside the file, place the following code.
import burlap.domain.singleagent.gridworld.*;
import burlap.oomdp.core.*;
import burlap.oomdp.singleagent.explorer.VisualExplorer;
import burlap.oomdp.visualizer.Visualizer;


public class HelloGridWorld{

	public static void main(String [] args){

		GridWorldDomain gw = new GridWorldDomain(11,11); //11x11 grid world
		gw.setMapToFourRooms(); //four rooms layout
		gw.setProbSucceedTransitionDynamics(0.8); //stochastic transitions with 0.8 success rate
		Domain domain = gw.generateDomain(); //generate the grid world domain

		//setup initial state
		State s = GridWorldDomain.getOneAgentOneLocationState(domain);
		GridWorldDomain.setAgent(s, 0, 0);
		GridWorldDomain.setLocation(s, 0, 10, 10);

		//create visualizer and explorer
		Visualizer v = GridWorldVisualizer.getVisualizer(gw.getMap());
		VisualExplorer exp = new VisualExplorer(domain, v, s);

		//set control keys to use w-s-a-d
		exp.addKeyAction("w", GridWorldDomain.ACTIONNORTH);
		exp.addKeyAction("s", GridWorldDomain.ACTIONSOUTH);
		exp.addKeyAction("a", GridWorldDomain.ACTIONWEST);
		exp.addKeyAction("d", GridWorldDomain.ACTIONEAST);

		exp.initGUI();

	}

}
This code will effectively recreate the same GridWorld GUI that we launched straight from the BURLAP jar, with the exception that we made the GridWorld have stochastic transitions. This means that as you control the agent with the w-s-a-d keys, you may find that it sometimes goes in the wrong direction!
After saving the file, we will compile it with the command
javac -cp lib/*:. HelloGridWorld.java
Now lets run it!
java -cp lib/*:. HelloGridWorld
If you're in the Windows command prompt (and not cygwin), you may need to change the colon character to a semicolon and if you're using cygwin, then you need to specify it as a cygwin path:
java -cp `cygpath -wp lib/*:.` HelloGridWorld
If everything worked, then you should have seen the same GUI as the one you saw when we ran code directly from the BURLAP jar.
Testing Plotting Tools
In these section we'll provide some code to make sure that your dependencies for the BURLAP plotting tools are working correctly. If you don't care about this, naturally you can skip this section.
Create a new file named "PlotTest.java" and put the following code in it.
import burlap.domain.singleagent.gridworld.*;
import burlap.oomdp.core.*;
import burlap.behavior.singleagent.auxiliary.performance.*;
import burlap.oomdp.core.TerminalFunction;
import burlap.oomdp.singleagent.RewardFunction;
import burlap.behavior.singleagent.learning.*;
import burlap.behavior.singleagent.learning.tdmethods.QLearning;
import burlap.behavior.singleagent.planning.deterministic.TFGoalCondition;
import burlap.oomdp.auxiliary.common.ConstantStateGenerator;
import burlap.behavior.statehashing.DiscreteStateHashFactory;
import burlap.oomdp.singleagent.*;
import burlap.oomdp.singleagent.common.SinglePFTF;


public class PlotTest{

	public static void main(String [] args){

		GridWorldDomain gw = new GridWorldDomain(11,11); //11x11 grid world
		gw.setMapToFourRooms(); //four rooms layout
		gw.setProbSucceedTransitionDynamics(0.8); //stochastic transitions with 0.8 success rate
		final Domain domain = gw.generateDomain(); //generate the grid world domain

		//setup initial state
		State s = GridWorldDomain.getOneAgentOneLocationState(domain);
		GridWorldDomain.setAgent(s, 0, 0);
		GridWorldDomain.setLocation(s, 0, 10, 10);

		//ends when the agent reaches a location
		final TerminalFunction tf = new SinglePFTF(domain.
			getPropFunction(GridWorldDomain.PFATLOCATION));

		//reward function definition
		final RewardFunction rf = new GoalBasedRF(new TFGoalCondition(tf), 5., -0.1);

		//initial state generator
		final ConstantStateGenerator sg = new ConstantStateGenerator(s);


		//set up the state hashing system for looking up states
		final DiscreteStateHashFactory hashingFactory = new DiscreteStateHashFactory();


		/**
		 * Create factory for Q-learning agent
		 */
		LearningAgentFactory qLearningFactory = new LearningAgentFactory() {

			@Override
			public String getAgentName() {
				return "Q-learning";
			}

			@Override
			public LearningAgent generateAgent() {
				return new QLearning(domain, rf, tf, 0.99, hashingFactory, 0.3, 0.1);
			}
		};

		//define experiment
		LearningAlgorithmExperimenter exp = new LearningAlgorithmExperimenter((SADomain)domain,
			rf, sg, 10, 100, qLearningFactory);

		exp.setUpPlottingConfiguration(500, 250, 2, 1000, TrialMode.MOSTRECENTANDAVERAGE,
			PerformanceMetric.CUMULATIVESTEPSPEREPISODE, PerformanceMetric.AVERAGEEPISODEREWARD);


		//start experiment
		exp.startExperiment();


	}


}
Then compile and run as before, except this time we'll specify the PlotTest class that we created:
javac -cp lib/*:. PlotTest.java
java -cp lib/*:. PlotTest
If everything worked, then you should have seen a bunch of plots showing the performance of a Q-learning algorithm that were updated in (semi) real time, similar to what is shown below.
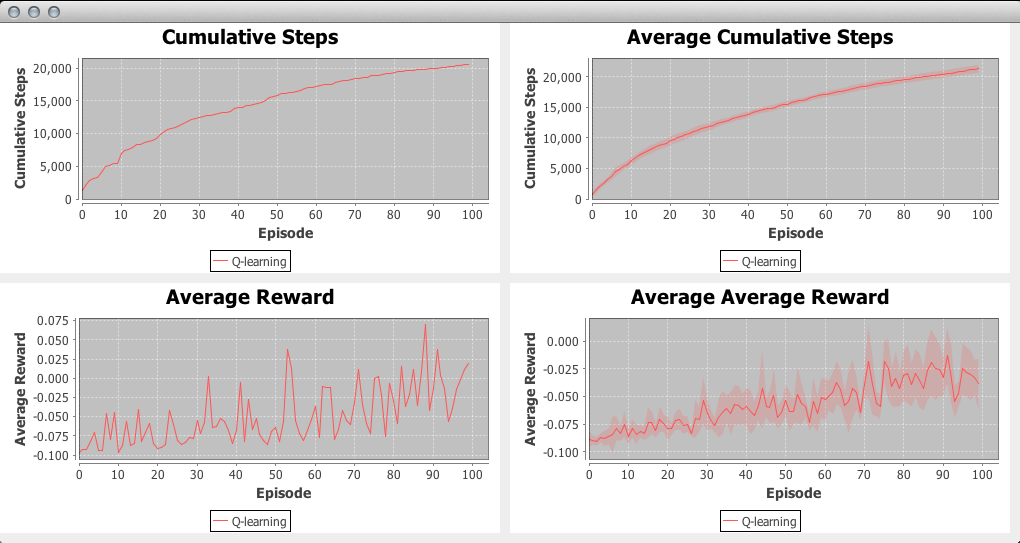
If you did not see something like the above, you may need to make sure that you have all the dependencies you need in the lib folder (see the Dependencies section for more details).
Notes on the Java Heap Size
Planning and learning algorithms often require a lot of memory for large problems, more than what java will typically use by default. Therefore, you may want to make sure that you increase java's heap size whenever you run BURLAP. You can do this with the -Xmx argument. For instance, to give java 2GB of memory to use, change the previous run commands to the following:
java -cp lib/*:. -Xmx2048M HelloGridWorld
Conclusions
In this tutorial we walked you through acquiring BURLAP and provided some simple code to make sure you can compile your own code with it. We strongly encourage you to use a full IDE, however, such as Eclipse. Just make sure that you add the jar files that we put in the lib folder to your Eclipse project's build path. Since all of the BURLAP java doc comes with the jar, Eclipse will autocomplete methods and explain the parameters, which should be very helpful.
Now that you've completed this tutorial, you are encouraged to check out the other BURLAP tutorials that are available. Happy coding!