Tutorial: Building a Domain
Tutorials > Building a Domain > Part 4
- Introduction
- Markov Decision Process
- OO-MDPs
- BURLAP OO-MDP Java Class Overview
- Defining GridWorld Object Classes
- Defining GridWorld Actions
- Defining Propositional Functions
- Testing the Domain
- The Components of a Visualizer
- Implementing the Painters
- Reward Functions and Terminal Functions
- Conclusions
- Final Code
The Components of a Visualizer
Different visualization components in BURLAP are built around implementing the RenderLayer interface, which requires being passed a graphics context on which the implementing class will paint. Having everything built around RenderLayer objects means you can trivially stack different kinds of information on top of each other. For example, you might have a render layer to display a state, and another one to display value function information, layered on top. In this tutorial we will focus on rendering the state, for which there is a specific implementation of the RenderLayer interface that we can use called StateRenderLayer, which after constructing we can pass to the Visualizer class, which will create a Java canvas to which are StateRenderLayer can paint.
The StateRenderLayer is provided a number of different subpainters that it will call sequentially to paint to the canvas. Each subpainter is either a StaticPainter or an ObjectPainter. The StaticPainter is an interface that requires implementing a method that takes a graphics context, an OO-MDP State object, and the width and height of the canvas that then paints to the canvas information about the overall state or the domain to which the state belongs. For example, in the grid world we've been creating, walls are not explicitly represented in our OO-MDP state object, but when rendering a state, we'd like to paint where the walls are.
The ObjectPainter is an interface that requires implementing a method that takes a graphics context, an OO-MDP state, a specific OO-MDP ObjectInstance from that state, and the width and height of the canvas that then paints to the canvas information about that specific object instance. In our GridWorld, we would want to provide a different ObjectPainter for the agent class objects and location class objects.
When our StateRenderLayer object is provided a bunch of StaticPainter and ObjectPainter objects, during it's state paint method it will first paint to the graphics context with the StaticPainter objects. Then for each OO-MDP object in the state, it will paint to the canvas using the corresponding ObjectPainter that we will associate with that class.
Implementing the Painters
To implement a StaticPainter for painting the walls of our grid world as black rectangles, add the below inner class to the ExampleGridWord class code we've been writing.
public class WallPainter implements StaticPainter{

	@Override
	public void paint(Graphics2D g2, State s, float cWidth, float cHeight) {

		//walls will be filled in black
		g2.setColor(Color.BLACK);

		//set up floats for the width and height of our domain
		float fWidth = ExampleGridWorld.this.map.length;
		float fHeight = ExampleGridWorld.this.map[0].length;

		//determine the width of a single cell on our canvas
		//such that the whole map can be painted
		float width = cWidth / fWidth;
		float height = cHeight / fHeight;

		//pass through each cell of our map and if it's a wall, paint a black
		//rectangle on our cavas of dimension widthxheight
		for(int i = 0; i < ExampleGridWorld.this.map.length; i++){
			for(int j = 0; j < ExampleGridWorld.this.map[0].length; j++){

				//is there a wall here?
				if(ExampleGridWorld.this.map[i][j] == 1){

					//left corrdinate of cell on our canvas
					float rx = i*width;

					//top coordinate of cell on our canvas
					//coordinate system adjustment because the java canvas
					//origin is in the top left instead of the bottom right
					float ry = cHeight - height - j*height;

					//paint the rectangle
					g2.fill(new Rectangle2D.Float(rx, ry, width, height));

				}


			}
		}

	}


}
The main idea of this code is to first determine how wide and tall cells in our grid world will be rendered on a canvas of the given size. This is simply with width/height of the canvas divided by the number of cells in our grid world along each dimension. Then we iterate through our map and draw a rectangle in the corresponding position when the map has a wall listed as being there. The only extra thing to take care of is that the Java painting coordinate system is in the top left corner, whereas we've defined our map with a bottom left coordinate system, so we perform a coordinate system switch in the rendering as shown.
Now lets create a painter for the OO-MDP agent class, which we'll represent as a gray circle in the word. This code will look almost identical to our map painter code except instead of iterating through the map, we'll get the agent x and y position from the OO-MDP ObjectInstance our painter is provided and instead of painting a black rectangle we'll paint a gray circle. As before add the below class inside our ExampleGridWorld class.
public class AgentPainter implements ObjectPainter{

	@Override
	public void paintObject(Graphics2D g2, State s, ObjectInstance ob,
			float cWidth, float cHeight) {

		//agent will be filled in gray
		g2.setColor(Color.GRAY);

		//set up floats for the width and height of our domain
		float fWidth = ExampleGridWorld.this.map.length;
		float fHeight = ExampleGridWorld.this.map[0].length;

		//determine the width of a single cell on our canvas
		//such that the whole map can be painted
		float width = cWidth / fWidth;
		float height = cHeight / fHeight;

		int ax = ob.getIntValForAttribute(ATTX);
		int ay = ob.getIntValForAttribute(ATTY);

		//left coordinate of cell on our canvas
		float rx = ax*width;

		//top coordinate of cell on our canvas
		//coordinate system adjustment because the java canvas
		//origin is in the top left instead of the bottom right
		float ry = cHeight - height - ay*height;

		//paint the rectangle
		g2.fill(new Ellipse2D.Float(rx, ry, width, height));


	}


}
We'll also do the same for a location object, but we'll use a blue rectangle instead.
public class LocationPainter implements ObjectPainter{

	@Override
	public void paintObject(Graphics2D g2, State s, ObjectInstance ob,
			float cWidth, float cHeight) {

		//agent will be filled in blue
		g2.setColor(Color.BLUE);

		//set up floats for the width and height of our domain
		float fWidth = ExampleGridWorld.this.map.length;
		float fHeight = ExampleGridWorld.this.map[0].length;

		//determine the width of a single cell on our canvas
		//such that the whole map can be painted
		float width = cWidth / fWidth;
		float height = cHeight / fHeight;

		int ax = ob.getIntValForAttribute(ATTX);
		int ay = ob.getIntValForAttribute(ATTY);

		//left coordinate of cell on our canvas
		float rx = ax*width;

		//top coordinate of cell on our canvas
		//coordinate system adjustment because the java canvas
		//origin is in the top left instead of the bottom right
		float ry = cHeight - height - ay*height;

		//paint the rectangle
		g2.fill(new Rectangle2D.Float(rx, ry, width, height));


	}


}
Finally, we'll want to add some methods to our ExampleGridWorld domain generator to create a StateRenderLayer and corresponding Visualizer to hold it. The StateRenderLayer merely needs to be given a WallPainter instance and told to use a AgentPainter instance for objects of OO-MDP class agent and a LocationPainter instance for objects of OO-MDP class location. Once a StateRenderLayer object is created, a Visualizer object merely needs to be pointed to it. To do so, add the following methods to our ExampleGridWorld class.
public StateRenderLayer getStateRenderLayer(){
	StateRenderLayer rl = new StateRenderLayer();
	rl.addStaticPainter(new WallPainter());
	rl.addObjectClassPainter(CLASSLOCATION, new LocationPainter());
	rl.addObjectClassPainter(CLASSAGENT, new AgentPainter());

	return rl;
}

public Visualizer getVisualizer(){
	return new Visualizer(this.getStateRenderLayer());
}
Note that in the getStateRenderLayer method we added the location object painter before the agent object painter. This implicitly tells the StateRenderLayer the order in which objects should be painted; first objects of class location and then objects of class agent. The result is that when an agent is at the same position as a location, the agent will be rendered on top of it.
Now that we can construct a visualizer, lets swap out our TermainalExplorer in our main method for a VisualExplorer. The VisualExplorer can be controlled by manually typing in actions into a text field, but it's often easier to control the agent with the keyboard. To do so, we can specify a binding between a key press and an action name with the addKeyAction method. In this case, we'll set 'w' to correspond to north; 's' south; 'd' east; and 'a' west. Change your main method to now look like the below.
public static void main(String [] args){

	ExampleGridWorld gen = new ExampleGridWorld();
	Domain domain = gen.generateDomain();

	State initialState = ExampleGridWorld.getExampleState(domain);

	//TerminalExplorer exp = new TerminalExplorer(domain);
	//exp.exploreFromState(initialState);


	Visualizer v = gen.getVisualizer();
	VisualExplorer exp = new VisualExplorer(domain, v, initialState);

	exp.addKeyAction("w", ACTIONNORTH);
	exp.addKeyAction("s", ACTIONSOUTH);
	exp.addKeyAction("d", ACTIONEAST);
	exp.addKeyAction("a", ACTIONWEST);

	exp.initGUI();


}
Now when you run your code, you'll be presented a visualization of the state and you can interact with it with the "wasd" keys, similar to what you see in the below image. Note that you may need to click on the image for it to begin accepting key presses.
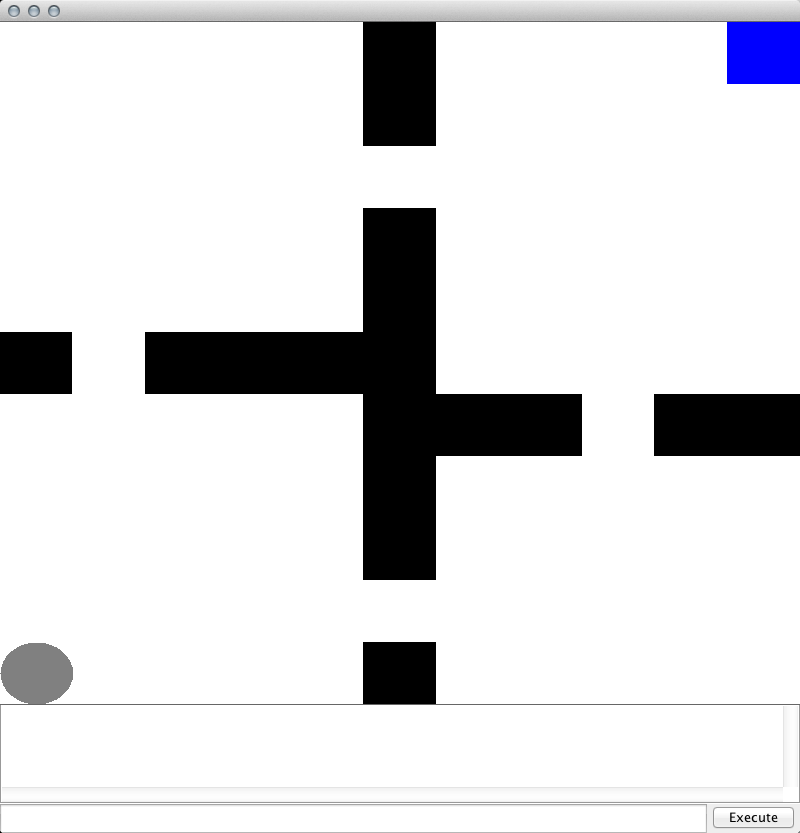
Remember, since we made movement stochastic, you may find the agent moving in unintended directions some of the time. Also note that when the agent enters the same position as the location object that in the bottom text box in the window you'll see "at(agent0, location0)" appear. This text box always lists all propositional functions that are true in the current state automatically.