Tutorial: Hello GridWorld!
Tutorials > Hello GridWorld! > Part 1
You are viewing the tutorial for BURLAP 2 with Maven. If you'd like the BURLAP 2 ant compiling and manual execution instructions, go here. If you'd like the BURLAP version 1 tutorial, go here.
Introduction
In this tutorial we will walk you through getting started with BURLAP. We will assume that you have Maven installed for this process, since it will make management of dependencies very straightforward. If you do not already have Maven installed, you can probably get it from your favorite package manager. For example, on Debian systems,
sudo apt-get install mavenOr on Mac OS with homebrew:
brew install mavenAlternatively, you can manually install it from https://maven.apache.org/download.cgi. Be sure to follow their installtion instructions.
To verify that you have maven installed try the following from the command line
mvn -v
We also highly recommend that you use an IDE for your work, which will make working with the library substantially easier. If you do not have an IDE we recommend either IntelliJ or Eclipse. Both will have tools for working with Maven projects. That said, for this tutorial we will give instructions using just the command line and your favorite text editor. You can probably follow along in an IDE if you prefer.
In this tutorial you will have two options. You can either build and install BURLAP from its source, or you can simply use the released version of BURLAP from Maven Central. The latter will require the least work, but if you'd like to be able to modify BURLAP at all, it may be worth checkout out the code and manually compiling it. If you prefer to simply use the Maven Central copy, skip the next section.
We will make use of the command line to test things out and compile everything. On the Mac and Linux you can just use the terminal. If you are windows, you can use either the command prompt something like Cygwin.
Compiling from Source
To compile the code from source, you will probably want to have git installed, or you can manually download the source from github. If you have git installed, navigate from your command line to a directory where you would like to place the code. Then type the following:
git clone https://github.com/jmacglashan/burlap.git
If you do not have git installed on your computer, then you can manually download the files by navigating to the website https://github.com/jmacglashan/burlap and clicking on "download zip" to save it and unarchive it at a desired location.
Whether you used git to clone the source, or manually downloaded it, navigate into the directory with your command line. The directory should look something like the following:
LICENSE
README.md
build.xml
burlap-repo
lib
pom.xml
src
testing
Now we can compile using Maven, which you should have installed on the previous step. You can use the standard Maven methods for compilation. That is, to simply compile the code, use
mvn compileTo create a jar file and Java doc in the target directory (as well as jar file that includes all dependencies) use
mvn packageAnd to install BURLAP to your local Maven repository, use
mvn installThat's it!
Hello GridWorld Project
Whether you compiled and installed BURLAP from source in the prior step or not, this next section is the same because BURLAP is available on Maven Central, which means Maven will automatically download it and install it if you did not compile it from source.
To begin our example project, create a directory somewhere on your file system where you will store the project code and navigate into it on your command line. If you've used Maven before, you may want to create your project by generating an archetype. Feel free to do so if you, like. However, we will manually set up the project from the command line and text editors here.
First create a file named pom.xml. With your favorite text editor, insert the following
You should set the group id at the top to anything that seems relevant for you, and you can also rename the artifact id to something else if you prefer. Note the <dependencies> section with the BURLAP dependency, which tells Maven that your project depends on BURALP. As of writing this tutorial, the latest version of BURLAP is 2.1.0. However, you may want to change this value to whatever the latest is, or to a version you prefer (especially if you've installed your own custom version with its own version number). You can see the list of all release versions of BURLAP from here.
The plugin we added will also allow us to use Maven to easily run code that we write.
Now create the following directory tree: src/main/java/myProj. Inside the nested myProj folder, we will create two text files, HelloGridWorld.java and PlotTest.java.
HelloGridWorld.java should have the following contents.
package myProj;

import burlap.domain.singleagent.gridworld.GridWorldDomain;
import burlap.domain.singleagent.gridworld.GridWorldVisualizer;
import burlap.oomdp.core.Domain;
import burlap.oomdp.core.states.State;
import burlap.oomdp.singleagent.explorer.VisualExplorer;
import burlap.oomdp.visualizer.Visualizer;


public class HelloGridWorld{

	public static void main(String [] args){

		GridWorldDomain gw = new GridWorldDomain(11,11); //11x11 grid world
		gw.setMapToFourRooms(); //four rooms layout
		gw.setProbSucceedTransitionDynamics(0.8); //stochastic transitions with 0.8 success rate
		Domain domain = gw.generateDomain(); //generate the grid world domain

		//setup initial state
		State s = GridWorldDomain.getOneAgentOneLocationState(domain);
		GridWorldDomain.setAgent(s, 0, 0);
		GridWorldDomain.setLocation(s, 0, 10, 10);

		//create visualizer and explorer
		Visualizer v = GridWorldVisualizer.getVisualizer(gw.getMap());
		VisualExplorer exp = new VisualExplorer(domain, v, s);

		//set control keys to use w-s-a-d
		exp.addKeyAction("w", GridWorldDomain.ACTIONNORTH);
		exp.addKeyAction("s", GridWorldDomain.ACTIONSOUTH);
		exp.addKeyAction("a", GridWorldDomain.ACTIONWEST);
		exp.addKeyAction("d", GridWorldDomain.ACTIONEAST);

		exp.initGUI();

	}

}
And PlotTest.java should have the contents
package myProj;

import burlap.behavior.singleagent.auxiliary.performance.LearningAlgorithmExperimenter;
import burlap.behavior.singleagent.auxiliary.performance.PerformanceMetric;
import burlap.behavior.singleagent.auxiliary.performance.TrialMode;
import burlap.behavior.singleagent.learning.LearningAgent;
import burlap.behavior.singleagent.learning.LearningAgentFactory;
import burlap.behavior.singleagent.learning.tdmethods.QLearning;
import burlap.domain.singleagent.gridworld.GridWorldDomain;
import burlap.oomdp.auxiliary.common.ConstantStateGenerator;
import burlap.oomdp.auxiliary.common.SinglePFTF;
import burlap.oomdp.auxiliary.stateconditiontest.TFGoalCondition;
import burlap.oomdp.core.Domain;
import burlap.oomdp.core.TerminalFunction;
import burlap.oomdp.core.states.State;
import burlap.oomdp.singleagent.RewardFunction;
import burlap.oomdp.singleagent.common.GoalBasedRF;
import burlap.oomdp.singleagent.environment.SimulatedEnvironment;
import burlap.oomdp.statehashing.SimpleHashableStateFactory;

public class PlotTest {

	public static void main(String [] args){

		GridWorldDomain gw = new GridWorldDomain(11,11); //11x11 grid world
		gw.setMapToFourRooms(); //four rooms layout
		gw.setProbSucceedTransitionDynamics(0.8); //stochastic transitions with 0.8 success rate
		final Domain domain = gw.generateDomain(); //generate the grid world domain

		//setup initial state
		State s = GridWorldDomain.getOneAgentOneLocationState(domain);
		GridWorldDomain.setAgent(s, 0, 0);
		GridWorldDomain.setLocation(s, 0, 10, 10);

		//ends when the agent reaches a location
		final TerminalFunction tf = new SinglePFTF(domain.
				getPropFunction(GridWorldDomain.PFATLOCATION));

		//reward function definition
		final RewardFunction rf = new GoalBasedRF(new TFGoalCondition(tf), 5., -0.1);

		//initial state generator
		final ConstantStateGenerator sg = new ConstantStateGenerator(s);


		//set up the state hashing system for looking up states
		final SimpleHashableStateFactory hashingFactory = new SimpleHashableStateFactory();


		/**
		 * Create factory for Q-learning agent
		 */
		LearningAgentFactory qLearningFactory = new LearningAgentFactory() {

			@Override
			public String getAgentName() {
				return "Q-learning";
			}

			@Override
			public LearningAgent generateAgent() {
				return new QLearning(domain, 0.99, hashingFactory, 0.3, 0.1);
			}
		};

		//define learning environment
		SimulatedEnvironment env = new SimulatedEnvironment(domain, rf, tf, sg);

		//define experiment
		LearningAlgorithmExperimenter exp = new LearningAlgorithmExperimenter(env,
				10, 100, qLearningFactory);

		exp.setUpPlottingConfiguration(500, 250, 2, 1000, TrialMode.MOSTRECENTANDAVERAGE,
				PerformanceMetric.CUMULATIVESTEPSPEREPISODE,
				PerformanceMetric.AVERAGEEPISODEREWARD);


		//start experiment
		exp.startExperiment();


	}

}
Your directory structure should now look like the following.
pom.xml
src/
	main/
		java/
			myProj/
				HelloGridWorld.java
				PlotTest.java
We're now ready to compile and run! In the command line, make sure you're in the same directory as your pom.xml file. Then, to compile, run
mvn compile
Maven should download BURLAP (if you did not manually compile it) and other information, and then compile your two sources.
To run the HelloGridWorld code, use the following command
mvn exec:java -Dexec.mainClass="myProj.HelloGridWorld"
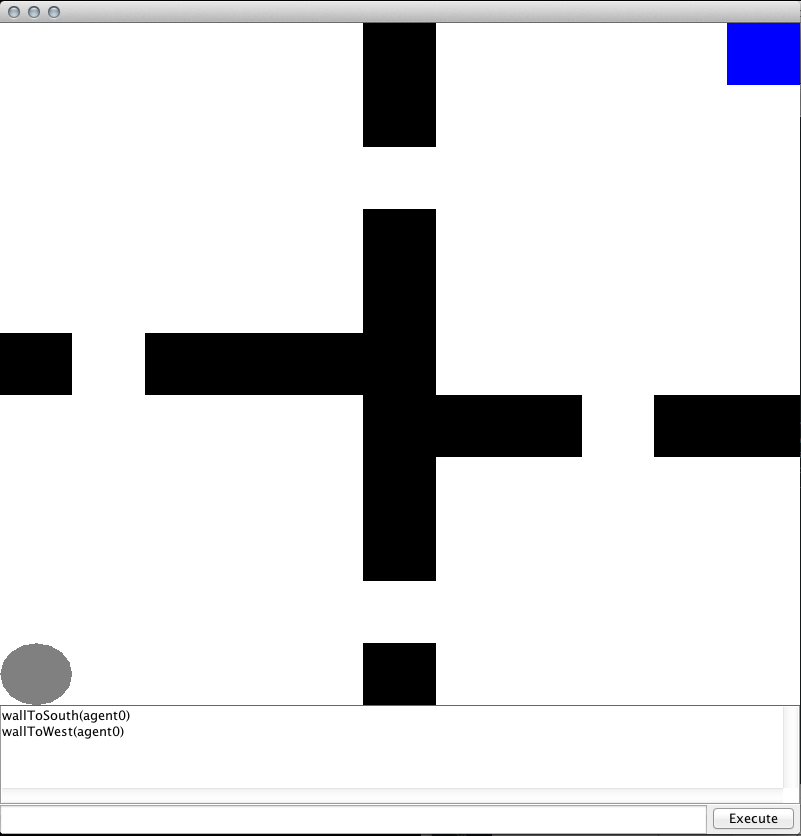
Running this code should launch a GUI with a grid world, similar to the image below. If you click on the image and then use the w-a-s-d keys, you'll be able to control the agent's movements. Note, however, that we made this a stochastic grid world in the code, which means some of the time you may find the agent going in a different direction than the one you intended!

We can similarly run our PlotTest code with
mvn exec:java -Dexec.mainClass="myProj.PlotTest"
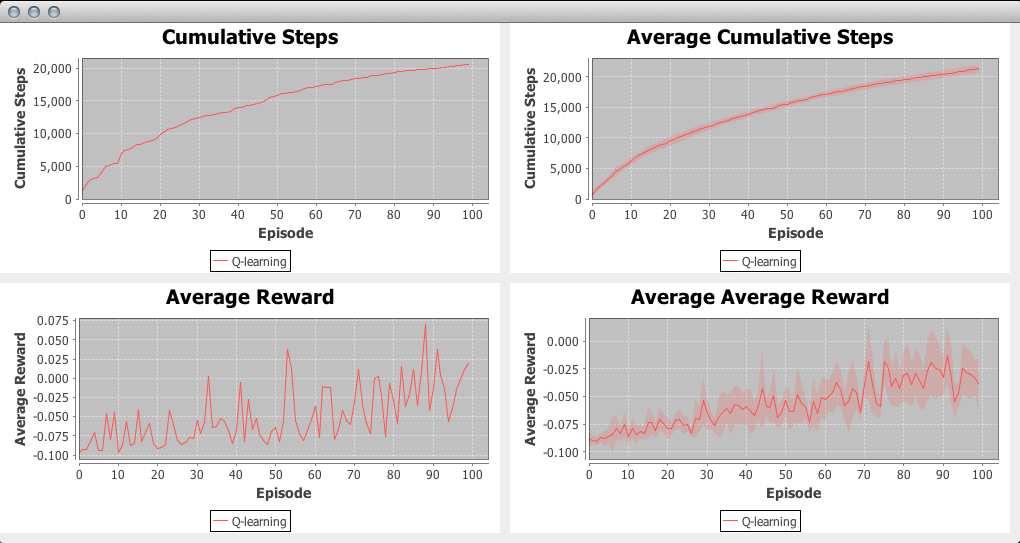
Which will run Q-learning on the same grid world 10 times, plotting the most recent trial and average performance. It should look something like the below image.

Conclusion
In this tutorial we walked you through compiling BURLAP and setting up your own Maven project that uses BURLAP. We used the command line to set everything up, but we strongly encourage you to use a full IDE for most projects, such as IntelliJ or Eclipse. You can initialize your projects the way we did here and then import the code into the IDE, or you can have these IDE's create a new Maven project themselves.
Now that you've completed this tutorial, you are encouraged to check out the other BURLAP tutorials that are available. Happy coding!